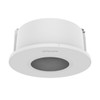
Hanwha SHD-1400FW Flush Mount Ceiling Bracket
Overview
The SHD-1400FW is a flush-ceiling integration bracket engineered for Hanwha IP cameras in suspended-tile ceiling environments. Unlike pendant or wall-mount alternatives, this bracket seats the camera lens flush with the ceiling surface—no visible mounting hardware, no cable conduits protruding below the tile, no visual obstruction from customer or employee sightlines. In retail floors, corporate lobbies, healthcare facilities, and other customer-facing spaces, this matters. You get surveillance coverage without advertising security infrastructure, preserving the acoustic and aesthetic integrity of the environment. The trade-off is installation precision: you must cut an ø185mm opening into the tile and work above the ceiling cavity.
Key Features
- Flush-ceiling integration eliminates visible mounting hardware. The bracket cavity sits entirely within the ceiling tile cavity; the camera lens mounts through a flush-panel opening. This design preserves sightlines and environment perception in spaces where discrete surveillance is a requirement. Pendant and pole-mount designs cannot achieve this aesthetic—they demand ceiling-mounted conduit or visible hardware below the tile. If your deployment prioritizes unobtrusive installation and ceiling tiles are load-bearing acceptable, this bracket is the correct choice.
- 2kg (4.4 lb) load capacity per mount handles compact fixed-dome and compact turret cameras. This is the critical limiting specification—oversizing the load risks catastrophic ceiling tile failure and poses a safety hazard. Verify your camera weight before purchase. Typical 2–4MP fixed domes and small turrets fall within this range; heavier 5MP+ turrets and all PTZ cameras exceed this capacity and require wall-mount or pendant alternatives. If your camera exceeds 2kg, this bracket is not suitable.
- Tile thickness accommodation of 10–70mm (0.4–2.8 inches) covers the vast majority of commercial suspended-ceiling systems. Standard acoustical fiberglass and mineral-fiber ceiling tiles fit squarely in this range. Tiles thinner than 10mm may flex excessively under the 2kg load; structural tiles or custom systems above 70mm require field verification. Contact your building's facilities team or a systems integrator if ceiling composition is non-standard before committing to installation.
- ø185mm ceiling-hole requirement demands precise layout planning and cannot be reversed. This penetration size weakens the tile locally; improper positioning risks structural failure, grid misalignment, or premature tile sagging. Use a template or a skilled tradesperson to mark and cut the opening accurately along ceiling grid lines. Once cut, the opening cannot be patched—the tile must be replaced. Poor planning here causes costly rework or abandoned installations.
- White polycarbonate construction (RAL9003) provides corrosion resistance and blends with standard office and retail ceiling finishes. Polycarbonate is lightweight (bracket weighs 505g / 1.11 lb total), impact-resistant during handling, and does not rust, degrade, or require maintenance under normal indoor conditions. The white finish matches typical drop-ceiling aesthetics. Outdoor or UV-exposed installations are not recommended—polycarbonate yellows and becomes brittle with extended UV exposure.
- TR20 Torx fastener is a standard, non-proprietary specification. Any technician with a basic TR20 Torx driver can service, adjust, or reinstall the mounting screw. No proprietary tools, no specialty hardware, no vendor lock-in on maintenance. Field repairs and adjustments remain straightforward across the product lifecycle.
- Compact footprint (ø202.3mm diameter × 92.7mm height) minimizes ceiling penetration and permits dense mounting patterns. The small profile allows multiple cameras to cover a zone without visual clustering or excessive tile perforation. Useful in open-plan offices, retail aisles, and warehouse zones where discrete camera distribution is preferred over centralized coverage points.
Integration and Compatibility
The SHD-1400FW is designed to integrate with specific Hanwha surveillance camera models: QNV-C8083R and QNV-C9083R. Verify your camera model against this compatibility list before ordering. Non-compatible cameras may not mount securely or may exceed the 2kg load limit. If your camera model is not listed, contact a systems integrator or check the manufacturer's compatibility matrix to confirm before purchase. Using non-compatible cameras voids any integration warranty and risks installation failure.
Installation Considerations
Successful deployment depends on three factors: (1) ceiling tile composition and thickness verification (10–70mm range), (2) precise hole cutting at ø185mm (recruit a skilled tradesperson if you lack cutting experience), and (3) camera weight confirmation (maximum 2kg). Plan cable routing above the ceiling cavity before mounting—cable runs must not rest on the camera or bracket to avoid mechanical stress. Ensure the ceiling grid can safely distribute the 2kg load; if tiles or grid show evidence of prior sagging or water damage, reinforce or replace before installing the bracket. Work with your building's facilities team to confirm ceiling load capacity and structural integrity. Once installed, the bracket requires no maintenance or adjustment—inspect periodically for loose fasteners (TR20 Torx wrench needed) and debris accumulation.
Frequently Asked Questions
Q: Can I mount a heavier camera on the SHD-1400FW if I reinforce the tile?
A: No. The 2kg load capacity is engineered for the bracket and tile system together. Exceeding this limit risks catastrophic ceiling failure regardless of tile reinforcement. If your camera exceeds 2kg, use a wall-mount or pendant system designed for that weight class.
Q: What if my ceiling tiles are thicker than 70mm?
A: Tiles thicker than 70mm fall outside the bracket's design range. Field-verify tile thickness and composition with your facilities team. If non-standard, consult a systems integrator to assess feasibility or recommend an alternative mount.
Q: Can I reuse the bracket if I relocate the camera?
A: Yes. The bracket can be removed and reinstalled by unthreading the TR20 Torx fastener. The original ceiling hole will remain; if relocating to a different ceiling location, you must cut a new ø185mm hole in the new tile (the old hole must be patched by replacing the tile).
Q: Does the bracket require any tools beyond a TR20 Torx driver?
A: A TR20 Torx driver is the primary tool needed for service and adjustment. Installation requires a hole saw or drill template to cut the ø185mm opening—recruit a professional if you lack cutting experience.
Q: What happens if I cut the ceiling hole in the wrong location?
A: The hole cannot be patched or repaired without replacing the entire ceiling tile. Use a template or a skilled tradesperson to mark the opening accurately before cutting. Measure twice, cut once.
Q: Is the SHD-1400FW compatible with non-Hanwha cameras?
A: The bracket is designed specifically for QNV-C8083R and QNV-C9083R Hanwha models. Do not attempt to mount non-compatible cameras—this risks load overage, misalignment, and safety hazards.
When to Choose a Different Mount
Wall mount or pendant bracket: If your camera exceeds 2kg, requires full PTZ capability, or if your ceiling tiles cannot safely bear additional load, select a wall-mount or ceiling-pendant system. Wall mounts are visible but eliminate ceiling penetration risk; pendant systems allow heavier cameras and provide adjustable positioning.
Recessed or surface mount: If your ceiling is gypsum board, concrete, or non-tile construction, a recessed or surface-mount bracket designed for that substrate is required. The SHD-1400FW is engineered exclusively for suspended acoustical tile systems.
Ted PerryPerspective based on aggregated IP Security Depot and affiliated engineering team experience.
The SHD-1400FW solves a real integration problem in commercial spaces where visible security infrastructure creates customer friction or regulatory headaches. The 2kg load limit and ø185mm tile perforation are not weaknesses—they're the engineering envelope you operate within. Get this right and you have a discrete, maintenance-free installation. Get it wrong (oversized camera, undersized tile, poor hole placement) and you have a safety liability and a ceiling repair bill.
Technical Highlights:
- 2kg load capacity: Sufficient for 2–4MP fixed domes and compact turrets; exceeding this is a fall hazard and structural failure risk. Verify camera weight before purchasing—non-negotiable.
- ø185mm ceiling hole: A single, irreversible penetration. Poor layout planning causes rework or abandoned installations. Use a template or hire a professional to cut accurately.
- 10–70mm tile thickness range: Covers standard acoustical ceilings. Out-of-spec tiles require field assessment and potential reinforcement or replacement.
- White polycarbonate, TR20 fastener: Low-maintenance, non-proprietary materials. Any technician can service the bracket without specialty tools or parts.
Deployment Considerations:
- Ceiling load assessment is non-optional. Confirm tile and grid integrity with your facilities team before installation. Prior water damage or sagging is a red flag.
- Cable routing above the ceiling cavity must avoid resting on the camera or bracket. Mechanical stress causes slow failure and intermittent camera dropouts.
- Installation is irreversible. The ceiling hole cannot be patched without tile replacement. Budget tile replacement cost into the project estimate if relocation is likely.
- The bracket is load-rated for QNV-C8083R and QNV-C9083R only. Do not attempt retrofits with non-compatible cameras—misalignment and safety hazards follow.
Deploy the SHD-1400FW in retail environments, corporate lobbies, and healthcare waiting areas where discrete camera placement preserves customer perception and ceiling aesthetics matter. It is not a general-purpose bracket—it is a purpose-built solution for a specific constraint: suspended-tile ceilings where visible security infrastructure is unwanted. In that scenario, it performs flawlessly.

")

")